


Yesterday I flagged the potential for a breakdown on the ASX 200. Not only because of the potential head and shoulders top, but also the bearish price action on US indices. We’ve since seen the S&P 500 and Nasdaq suffer their worst daily losses in several weeks, and the ASX 200 confirm the topping pattern with a daily close beneath 8130.
Clearly, this puts indices on the ropes today. Which is interesting, as US and APAC indices tend to on the Friday before the election. Sure, yesterday’s losses were on the large side. But there may still be some bearish follow-through ahead of the weekend, as traders react to yesterday’s losses, book profits or deleverage to avoid gap risks over election weekend.
But it might be a different story when we get to next week.

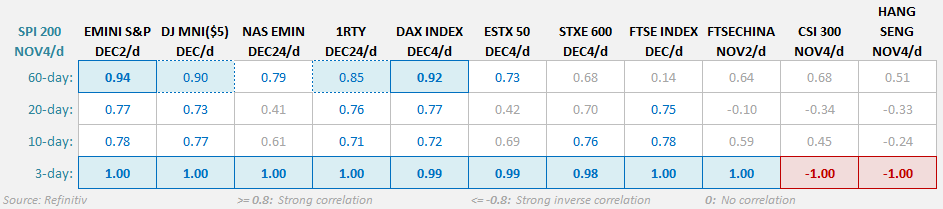
Indices tend to outperform into the election
Indices across Asia, Europe and the US tend to rise on the Monday and Tuesday of the election. I’ll nit pretend to know why, but on average they do. And with the whole world now bearish stocks (according to my social media feeds) I cannot help but wonder if some bears will get burned as we enter next week. Besides, as you’ll soon see, several markets are at or near support levels.

What happens at or beyond the election is anyone’s guess
- Possible downside risk for stocks is if riots break out, calls for election fraud hit new heights and it turns into a bit of a farce, And that could be the more volatile affair
- Indices could face pressure if Trump is ahead on the polls, given his policies are deemed the more inflationary. However, we’ve already seen a decent selloff from the highs by recent standards, and remember that the stock market entered an almighty bull market when he was last elected right from his acceptance speech
- Indices could lift if Harris takes the lead, or of course wins. But I think this is more a case of them being allowed to return to their normal trend, as opposed to Harris being good for the stock market.
- With that all in mind, take note that indices tend to soften on the Wednesday (while votes are tallied) and the day after the election.
- Wednesday is generally the most volatile day, followed by Thursday
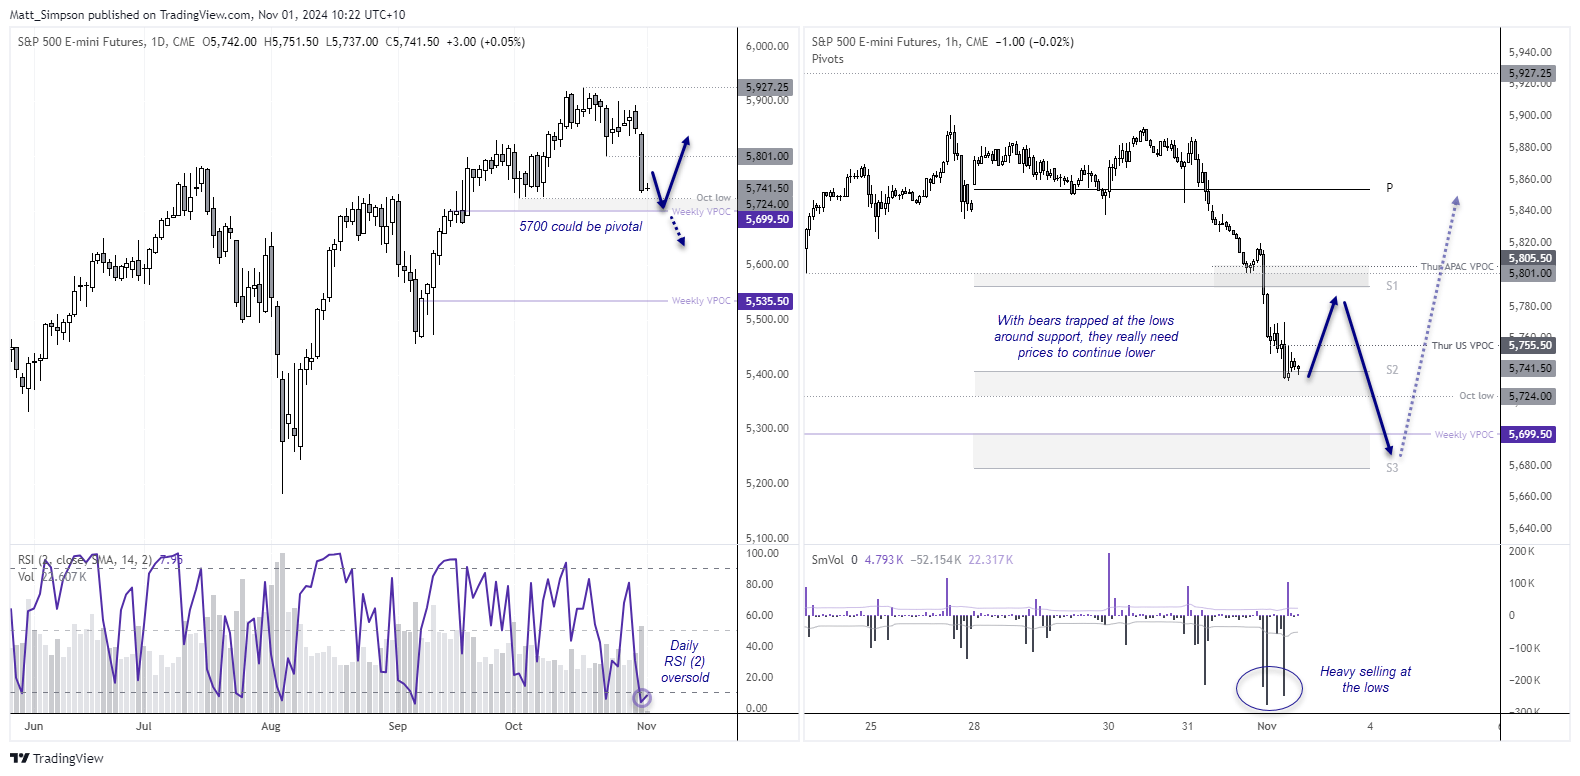
S&P 500 futures technical analysis:
Bears clearly had their way on Thursday, driving the S&P 500 down to a 17-day low. Daily volume was also its highest in a month to show bearish initiation. However, much of this bearish volume was in the second half of the day, so if prices don’t continue lower they could be forced to short cover and send prices higher, over the near-term.
It is therefore worth noting that prices stalled just above the October low and a weekly volume point of control (VPOC), which makes the 5700 – 5724 zone a pivotal area.
The 1-hour chart shows support was found at the weekly S2 pivot, and with bears trapped I now favour a minor bounce before the next leg lower ahead of the weekend. But as we approach next week, I will be monitoring price action for a potential rise into the election.

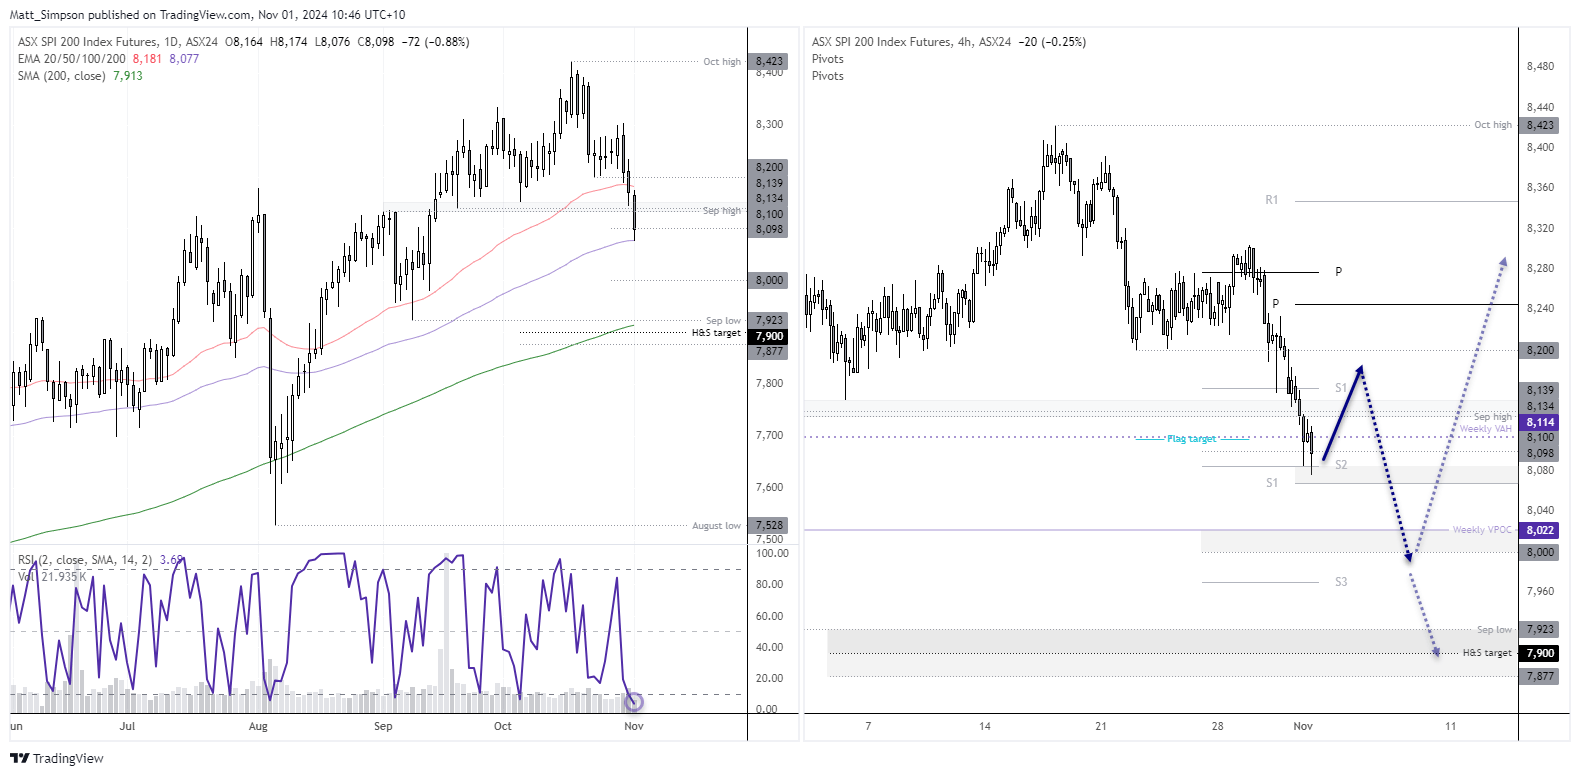
ASX 200 futures (SPI 200) technical analysis:
We saw a so-lid close beneath the 8130 level I decided would confirm the head and shoulders top. If successful, it projects a target around the 200-day average and 7900 handle. The best H&S tops generally see direct losses when the neckline is broken, and such a move would assume global stocks are in a rout and something catastrophic has happened, by investor’s standards.
I should warn you that few H&S tops are such textbook examples, and that they tend to provide twists and turns along they way, more often than not. And many fall short of their bearish targets, assuming they don’t invalidate the neckline first.
Besides, the daily low was supported by the 100-day EMA and the daily RSI (2) has fallen to its most oversold level since April.
The 4-hour chart shows yesterday’s bear flag target was reached, but prices have also found support at the weekly R2 pivot. If the S&P 500 can muster up a bounce, so could then ASX.
A break above 8150 assumes a deeper retracement, although I suspect bears will seek to reload around 8200 unless we have a broad rally for global stock markets.
-- Written by Matt Simpson
Follow Matt on Twitter @cLeverEdge


Latest market news
Yesterday 11:06 PM
Yesterday 01:00 PM
November 30, 2024 12:00 PM
November 29, 2024 05:53 PM
Latest articles

November 30, 2024 12:00 PM

November 29, 2024 05:53 PM

November 29, 2024 12:43 PM

November 29, 2024 01:55 AM