


Tuesday US cash market close:
- The Dow Jones Industrial fell -184.74 points (-0.56%) to close at 32,632.64
- The S&P 500 index rose -30.39 points (2.51%) to close at 34,058.75
- The Nasdaq 100 index fell -51.775 points (-0.39%) to close at 13,267.61
Asian futures:
- Australia's ASX 200 futures are up 5 points (0.07%), the cash market is currently estimated to open at 6,985.30
- Japan's Nikkei 225 futures are up 110 points (0.45%), the cash market is currently estimated to open at 24,900.95
- Hong Kong's Hang Seng futures are down -5 points (-0.02%), the cash market is currently estimated to open at 20,760.87
- China's A50 Index futures are up 4 points (0.03%), the cash market is currently estimated to open at 13,726.87
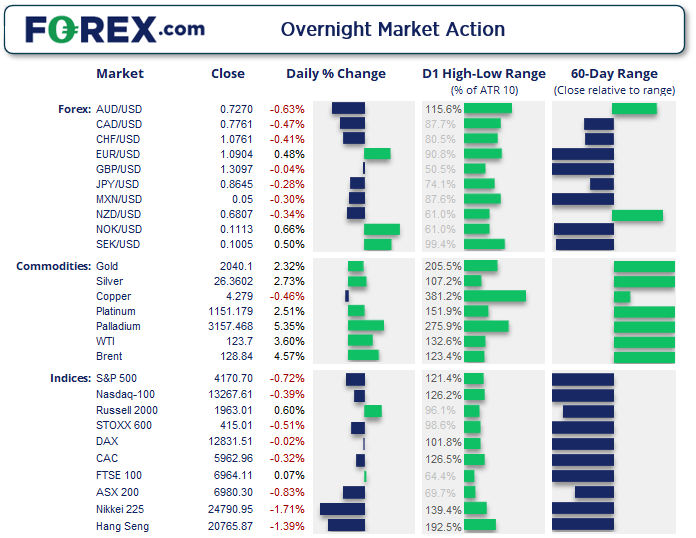
Wall Street down, but volatility recedes
The appetite to be bullish the market is clearly lacking, despite attempts earlier in the US session to do just that. But downside volatility has certainly receded, and with several key indices approaching key support levels the potential for a countertrend bounce is something to at least consider. As mentioned in yesterday’s video there are several potential support levels around 13k, and the index closed with an inverted pinbar so there is clearly a hesitancy to break immediately lower.
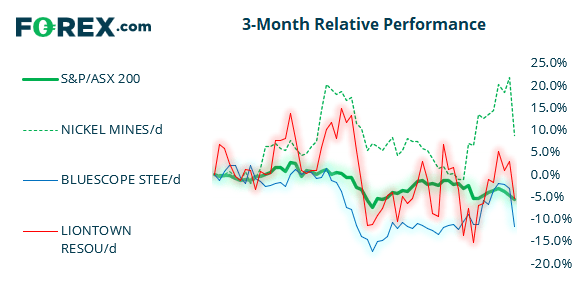
ASX 200:
Rising commodity prices failed to support the ASX yesterday, with the index closing below 7000 for the first time since after its third day of straight losses. It also closed at the low of the day. Yet key support levels reside between 6960/80, and futures markets are implying a flat open so there is also hope that selling pressure could recede today. Should the market initially fall yet close within or above the support zone, it could be the first clue that a base is being formed whilst a daily close beneath 6960 paves the way for further declines.
Read our ASX 200 trading guide
ASX 200: 6980.3 (-0.83%), 08 March 2022
- Healthcare (1.85%) was the strongest sector and Energy (-3.57%) was the weakest
- 7 out of the 11 sectors closed lower
- 8 out of the 11 sectors outperformed the index
- 58 (29.00%) stocks advanced, 135 (67.50%) stocks declined
Outperformers:
- +6.43% - Meridian Energy Ltd (MEZ.AX)
- +4.44% - Imugene Ltd (IMU.AX)
- +3.89% - Zimplats Holdings Ltd (ZIM.AX)
Underperformers:
- -10.6% - Nickel Mines Ltd (NIC.AX)
- -8.83% - BlueScope Steel Ltd (BSL.AX)
- -7.91% - Liontown Resources Ltd (LTR.AX)
US and UK move to bank Russian oil imports
Whilst the US appears to be moving swiftly to cut out Russian oil, it is not so simple for the UK due to their reliance on imported oil at a time when energy prices have already pinched the consumer. But with that said, UK PM Johnson has vowed to phase out Russian oil by the end of the year. European leaders are set to discuss phasing our Russian oil at tomorrow’s meeting in Versailles, and we’re certain a key point will be Russia’s threat of simply cutting off Europe’s supply – which accounts for around 40% of consumption. WTI rose 3.6% to 123.70 and brent was up 4.6% to 128.84.
US dollar remained the strongest currency
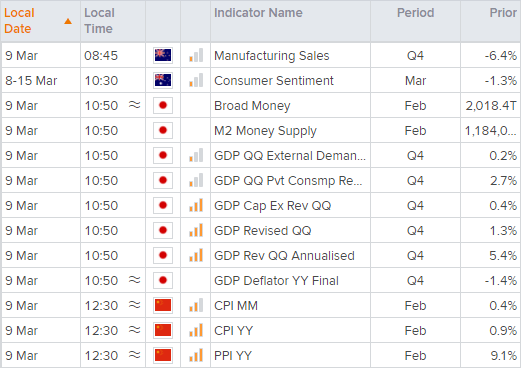
With safe-haven flows and the prospects of Fed hikes still on the table, the dollar remained attractive to traders. USD/CAD rose to a YTD high and AUD/USD is below 73c as it embarks on its countertrend move. Another Aussie pair we’re watching is AUD/JPY as we suspect it is closer to completing its retracement then AUD/USD is. GDP data is scheduled for 10:50 AEDT which puts yen pairs into focus, followed by China’s inflation data at 12:30 which put AUD pairs into focus.
EUR/JPY rises into resistance
We have seen a decent pullback on euro pairs over the past 24-hour, but that does not mean they are out of the bearish woods. Taking EUR/JPY as an example, it has retraced into a resistance zone which includes several levels including the weekly pivot point, monthly S1 pivot and 50% retracement level.

A bearish engulfing candle has formed on the four-hour chart which suggests the market is trying to carve out a swing high. Should we see a decent break of its low then we can assume the corrective high is in place at 126.75 and target the 124.37 low. Should it continue to grind higher then we would be on the lookout for reversal pattern around or below 127.18.
Up Next (Times in AEDT)
How to trade with FOREX.com
Follow these easy steps to start trading with FOREX.com today:
- Open a Forex.com account, or log in if you’re already a customer.
- Search for the pair you want to trade in our award-winning platform.
- Choose your position and size, and your stop and limit levels.
- Place the trade.


Latest market news
Yesterday 11:06 PM
Yesterday 01:00 PM
November 30, 2024 12:00 PM
November 29, 2024 05:53 PM
Latest articles

November 30, 2024 12:00 PM

November 29, 2024 05:53 PM

November 29, 2024 12:43 PM

November 29, 2024 01:55 AM