


Gold forecast: these key drivers could propel metal to $2500
I think gold is likely to reach $2500, possibly in the next few trading days. For one thing, the underlying trend remains bullish, which is discouraging bearish speculators to step in ahead of such a big psychologically important level. For another, there are little fundamental justifications for short selling gold. In fact, some would argue that gold remains undervalued given the big devaluation and loss of purchasing power fiat currencies have suffered across the world in recent years owing to high inflation which is still rising in some places. Although the disinflation process is evident elsewhere, this is not to be confused with deflation. Prices are still rising, just not at the same pace as before. Inflation hedging demand should still provide support for gold. What’s more, the sharp drop in bond yields amid expectations of rate cuts by the Fed should benefit assets with zero or low yields on a relative basis.

Dollar forecast remains modestly bearish despite retail sales beat
In the week ahead, the economic calendar is quieter, and it could be a long wait until we potentially hear something meaningful from the Fed and other central bank officials at the Jackson Hole symposium on Friday. This week’s US retail sales data was a fair bit stronger than expected, but the Fed’s attention is turning to employment and is no longer just focused on getting inflation back under control. While the disinflationary story continues, the fact that the unemployment rate has been climbing, now at 4.3%, it is already way higher than the Fed's year-end target. Dollar traders are paying more attention to employment data than anything else right now, which explains why the dollar has struggled to hold onto its retail-sales-driven gains.
FOMC set to cut rates in September
Although the last couple of jobless claims releases were slightly better than expected, several other jobs market data have all pointed to a softening labour market recently. To help prevent job losses and ensuring maximum employment, the Fed must ensure not to maintain an excessively tight policy than needed. Despite the Fed remaining cautious, the market has decided that the Fed will want to avoid unnecessary economic strain and that it will loosen its policy by around 100 basis points by the end of the year, with September now likely to see just the 25 rather than 50 basis point cut that was priced in a couple of weeks ago. Still, the calmer risk tone across financial markets should prevent the dollar from staging a substantial recovery.
Jackson Hole Symposium is key event next week bar PMIs
As mentioned, the economic calendar is quieter in the week ahead. The key event is likely to be the Economic Policy Symposium in Jackson Hole, Wyoming, on Friday.
The only exception being the global PMIs in mid-week. For US PMIs, the focus will be on services inflation and whether there is evidence of continued deceleration. A gradual slowdown supports the soft-landing narrative, but weaker-than-expected data—whether in headline figures, new orders, prices, or employment—could trigger a dollar sell-off as the market speculates on Fed rate cuts.
The Jackson Hole Symposium draws central bankers, finance ministers, and financial market participants from across the globe. The Fed has historically used this convention to signal major policy changes. Are we going to see the biggest hint yet that the FOMC will embark on a rate cutting cycle starting at their 18 September meeting? Recent data showing stronger retail sales and jobless claims indicate that a 25-basis point cut at the September FOMC meeting seems more probable than a 50-basis point reduction that was priced in a couple of weeks ago. However, given the Fed’s increasing emphasis on the labour market, the upcoming non-farm jobs report on September 6 will be crucial in determining the final decision. Still any strong hints of a cut in September at the Jackson Hole symposium could send the dollar lower and underpin the gold forecast.
Gold forecast: XAU/USD technical analysis points to $2500
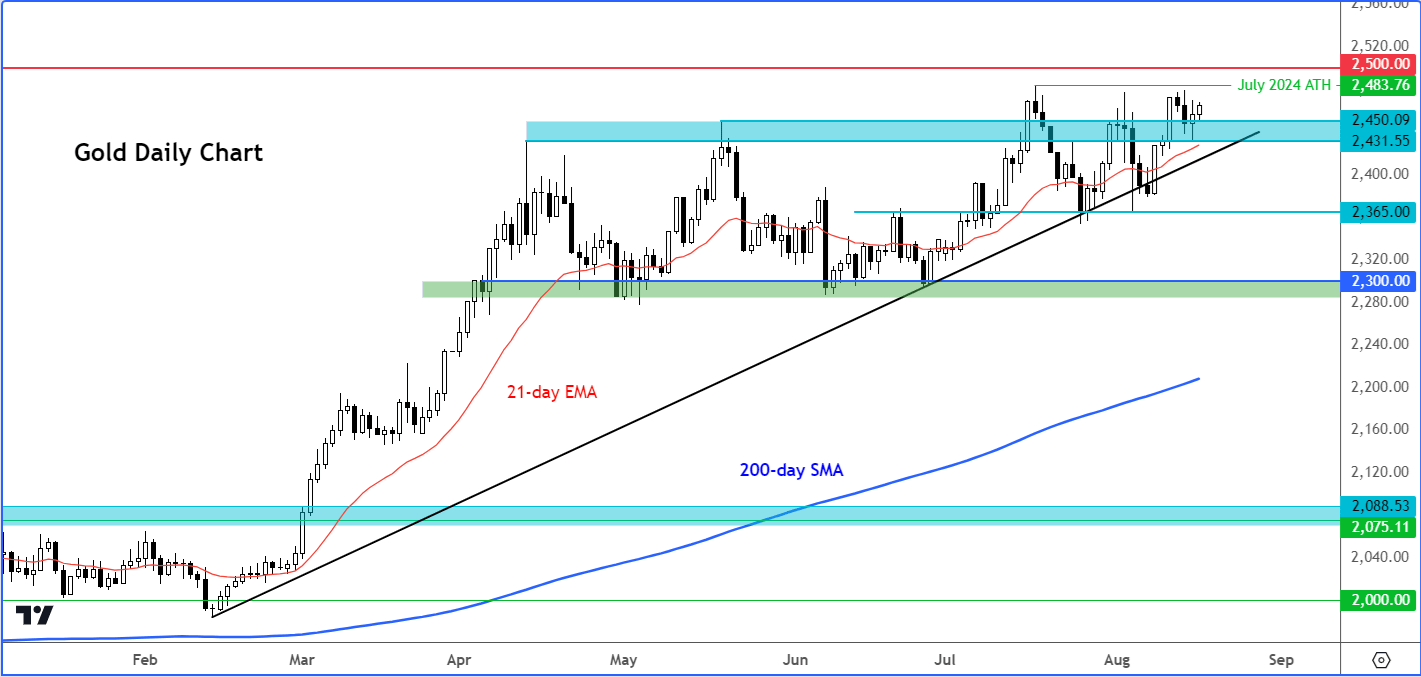 Source: TradingView.com
The higher highs on the gold chart and weakening selling pressure means bullish traders are chipping away at sturdy resistance seen between $2470 to $2480 area. If broken, which looks likely, we could see gold head to the next psychological level of $2500 before it decides on its next move. Short-term support comes in at $2450 and then at $2430ish.
-- Written by Fawad Razaqzada, Market Analyst
Follow Fawad on Twitter @Trader_F_R


Latest market news
Yesterday 11:06 PM
Yesterday 01:00 PM
November 30, 2024 12:00 PM
November 29, 2024 05:53 PM
Latest articles

November 29, 2024 12:43 PM

November 22, 2024 12:51 PM

November 13, 2024 01:03 AM

November 8, 2024 02:15 PM